
This guide is for business owners or managers, not SEO experts, who have 30 minutes per day to spend on their own local SEO for their business. The guide will outline realistic daily tasks that you can do, hopefully, in a manner that you can understand. It is intended to be an easy to understand and actionable resource to help any local business become more visible for searches within their geographical area. We believe a lot of these tasks are realistic for businesses to do on their own without the extra expense of hiring an SEO firm. Within this guide you will find:
- 10 daily tasks that will take no longer that 30 minutes which you can do every day
- Suggestions on free SEO resources and tools
- Step by step guide for each daily task
Task #1 - Evaluate Your Current Website Platform
Without a solid website platform your local SEO efforts could be at a disadvantage right from the start. Think of this as the foundation. Do an honest assessment and ask yourself these questions:
- Is it easy for me to login and update the content on my website?
- Does my website load fast? If unsure go to https://gtmetrix.com and plugin your web address, your site should load in less than 2 seconds.
- Does my site look good on mobile, tablet, and desktop screens?
If you cannot answer "yes" to all of these questions then you will want to get this addressed before proceeding. Here is an actionable plan for you to make sure you can answer "yes" to all these questions.
How to set up a WordPress Website in Minutes
- Go to https://wordpress.com
- Click "Get Started" in the upper right corner
- Choose "start with a website"
- Enter in a keyword that describes your business
- Choose the FREE option at the top (end with wordpress.com) unless you want to use your custom domain
- Choose the FREE plan
- You will logged in right away
- In the left column click the "Themes" link
- Choose a theme you want to work with
That is it! Now you have a website that is:
- Easy to update
- Uses WordPress
- Uses a host that is fast and will typically load your website in less than 2 seconds
- Uses a theme that is responsive (looks great on all devices)
Additional Option
If you feel uncomfortable setting this up then you can contact us. We can have a WordPress or Drupal website installed and ready to go in minutes on a very fast cloud hosting server.
Task #2 - Claim Your Google Business Listing
This task involves finding and claiming your Google My Business listing. If you already have a Google My Business listing and you have the ability to manage it then you are done with this task. If not, then here are the steps you need to take.
- If you don't have a Google Account then sign up for a free account here.
- Once you have an account go to Google Business and login with your Google Account.
- Click the + icon in the lower right corner of the screen.
- On the next page enter all of your business information and follow the prompts.
- If you are a service based business you will be able to select an option so your actual address will not be shown on maps. It is important that brick and mortar locations DO NOT check that option.
- When you are done entering your information you will get a notification that a postcard with a verification code is being mailed to the address provided.
That is all for task #2! We will optimize your Google My Business listing once we have optimized your website and verified your listing. In the meantime you should be on the lookout for a postcard from Google with the verification code. Once you receive it then sign in to Google Business with your Google account and verify your account.
Task #3 - Analyze & Hook Up Your Social Media
This is a fairly easy but necessary task. If your business is actively seeking out marketing strategies then building up a good social media presence is a great option. If you do it right you will be able to market to your perfect demographic. We are not going to discuss how you should build you social media strategy in this article, we are going to make sure your website is connected to your social platforms so that Google and other search engines recognizes the correlation between your website and your social media pages.
First, take inventory of all your social media pages and ask yourself a few questions:
- which pages seem to drive traffic to my website?
- which platforms do we invest more time with and are more active on?
- are there any pages that we really don't use and look stale?
- are there any platforms we have not signed up for yet that we think would benefit our business?
After taking inventory of your social media then go ahead and delete your accounts on any platforms in which you are not active. You always want your business to look vibrant and blank or un-used pages make a bad impression.
If there are any platforms you will use to engage with potential customers within your target demographic then go ahead and sign up.
Connecting to your website
If your website is live and using your businesses domain then you will want to login to each of your social media pages and enter your domain into the "website" (or equivalent) field in your profile.
On your website you will want to make sure that you have a link to each of these social media profiles somewhere on each page. Depending on the theme or design of your website the links might go in the header or the footer.
Using WordPress you can use the Menu Social Icons plugin as an easy way to add your social media links to any region of your website. The nice thing is that this plugin uses fontawsome icons so they look crisp and sharp on all devices.
Once you have done this then it sends signals to the search engines that these social media profiles are connected to your business website. It can have some great advantages too. For example, if you get good reviews on Facebook then these might get displayed when someone views your business in search results.
There is one more way in which to let search engines know about your social media profiles and we will cover this when we discuss how to add structured data to your site.
Task #4 - Consistent NAP's and Structured Markup
Make sure NAP's are 100% accurate and consistent
The first thing you want to do here is have a close look at your website, more specifically, any area of your site that mentions your business name, address, phone number, and business hours (also referred to as NAPs). It is vital that this information is consistent with your Google Business listing and all of the social media profiles you have created. It is just a good idea to double check and make 100% sure that this information is correct and consistent before moving forward.
Add Structured Markup
This is not as tough as it might look! This might seem a little on the technical side but it is not very complicated and it will help search engines discover more about your business and ultimately deliver accurate information to your clients, customers, or users. Structured mark-up is a bit of code that goes into the <head> section of your home page. The recommended format by Google is JSON-LD. Again, don't worry about whether or not this sounds technical because you can generate the needed code using a free tool and then we will add it into the website using a plugin.
To generate your JSON-LD code use this free tool and make sure to complete the form with as much information as possible. Make sure this information is consistent with the name, address, phone, and hours on your website. You code should look something like the image below.
If you use WordPress there is a handy plugin that will allow you to easily add this code into the <head> portion of your website. The Header and Footer Scripts plugin can be found here. Once you have installed this plugin then go in and edit your home page. You will see a new field to enter scripts into the <head> section of that page. Go ahead and copy your JSON-LD code into this field and save your page.
Task #5 - Evaluate & Update Website Structure
A good website structure is one that is most beneficial for your users. The first thing you should look at is your overall structure. For an optimal website structure for a local business you will want the following pages to be visible from your main navigation:
- Home
- Services
- About Us
- Blog / Articles
- Contact Us
Organizing Services Pages
The most important content you can add to your website are specific services and articles that will be helpful to your target users. Therefore when you add pages to your website that are specific services then they would be a sub-navigation item under "services". For example, a home remodeler may have separate pages for kitchen remodeling, basement finishing, etc...
Organizing Blog Entries and Articles
If you plan to create blog entries and articles then you may want to consider organizing them one step further into categories. The categories will then become sub-navigation items of the "blog / articles" navigation item.
For this task you may need to do very little work, if any , depending on how well your site is structured. If you have a lot of content but it is not organized like this then this task simply involves re-organizing it using this model. If you don't have any content yet you can simply take the time to make sure and set up the structure even if it requires setting up placeholder pages and adding content to them later. Just make sure your site structure is set up in a similar way and is easy for your users to understand.
Task #6 - Optimize Your URL Structure
If you have a current website then this task involves two steps, for new sites (that have not been indexed yet) there is only one step. In this task you will define the url structure on your website. A good url structure has been shown to help search engine rankings but more importantly it makes sense for your users. Here are examples of what we will want your URL structure to look like:
- Home - https://www.yourdomain.com/
- Services - https://www.yourdomain.com/services
- Service #1 - https://www.yourdomain.com/services/service-name
- Service #2 - https://www.yourdomain.com/services/service-name
- About Us - Service #1 - https://www.yourdomain.com/about-us
- Blog / Articles - Service #1 - https://www.yourdomain.com/articles
- Category #1 - https://www.yourdomain.com/articles/category-name
- Category #2 - https://www.yourdomain.com/articles/category-name
- Contact Us - https://www.yourdomain.com/contact
Defining your URL Structure in WordPress
Defining the url structure for regular pages is very easy in WordPress. When you edit the page from within WordPress you will notice near the top a field named "permalink" if you click the edit button as shown below then you can manually set the url.
If you will be posting a lot of blogs or articles then you will want to set the url structure to be set automatically. Therefore you will be able to know that whenever you publish content it will be consistent with the url structure you have laid out. For example you can have all of your articles have a structure like https://www.yourdomain.com/blog/category-name/blog-title.
Setting your URL Structure Automatically in WordPress
WordPress allows you to easily update your settings so you can set the urls to follow your url structure. When you are logged in to the administration area of your website follow these steps:
- From admin menu (usually along the left side) click "settings"
- Click on "permalinks"
- On the permalink setting page select the "Custom Structure" option under "Common Settings"
- Enter the following into the "Custom Structure" field: %category%/%postname%/
- Or, if you do not plan to have categories then enter: /blog/%postname%/
Your url structure should now be set!
Task #7 - Optimize Content
If you have never optimized your content then this task could take a while if you try to do your entire site at once. Therefore we recommend doing one page per day. This will help keep you fresh and not cut corners. If you limit yourself to one page or piece of content per day then it will rarely take you longer than 30 minutes.
Set Your Standards
One thing we like to do is set up standards so that every page has a minimum word count. Google does not like thin content so if your page is seen as one with a lot of thin content it could make it harder for you to rank your important pages. Here are some standards we like to adhere to:
- minimum of 500 words per page, ideally over 1000 words
- at least one engaging and relevant image
- limit each page to a specific service, topic, or subject
- one external text link to a relevant webpage that can offer the user additional information
- two internal text links to relevant pages on your website
- the content must be 100% original, never copy and paste content from another website
The one page where this may not make sense is the contact page. All other pages that can offer helpful information to your users should have a similar set of standards. When you evaluate some of your pages on your site you may find that you need to add additional information. The key is to always make sure you are providing information that might be helpful to your users.
Task #8 - Update H1, Title Tags, and Meta Descriptions
In this task you will evaluate each page of your site and make sure your H1, page title, and meta-descriptions are optimized. This task is meant to be completed after you have updated all of the content on your site based on the standards and guidelines your set for your website.
We optimize the H1, Title Tags, and Meta Descriptions because they have the most impact on informing your users about your content, and therefore, have the most impact on your SEO efforts. Lets go through each item separately.
Optimizing Your H1 Tag on Your Website
The H1 tag is the main heading of your webpage. There should only be one h1 heading and it should inform the user on exactly what your content is about. The h1 tag should:
- contain your target keywords
- be easy for users to understand
- be very similar and sometimes match your page title
**For service based pages you should list your service first followed by your location
For example, if I have a page about our dog washing service located in Boulder, Colorado the page title should be something along the lines of "Dog Washing in Boulder, Colorado".
In most content management systems the title you give your page will automatically get assigned the h1 tag. This is true for WordPress as well unless you make modifications to your theme. In most cases you do not have to worry about this. Below shows the title of your page that will become the h1 tag.
Optimizing Your Page Title
The page title is important because this is what is shown in the search results (see below).
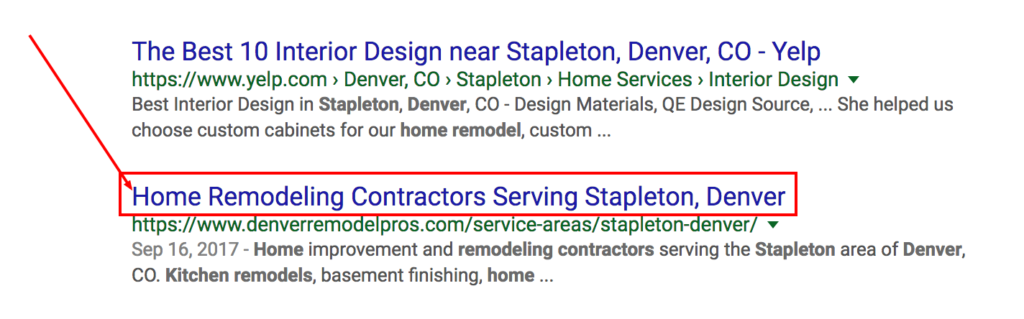
The page title should also be directly relevant to the content on your page and just like the h1 tag it should list your service followed by your location. The goal of your page title should be to attract your target users to click on your page. An increase in CTR (click-through-rate) has been shown to increase search rankings. Some good rules of thumb for page titles include:
- use a minimum of 30 characters
- use a maximum of 65 characters (as of Nov 2017)
- the service should go before the location
- it should be closely related if not exactly the same as the h1 tag
Using the Yoast plugin on WordPress you can manually set your page title and make it different than what you named your page in the title field. To do this you need to first install the Yoast plugin. Once it is installed you can manually update the page title in the Yoast SEO section near the bottom of the form where you edit your page. In the Yoast SEO section click the "Edit Snippet" button as shown below.
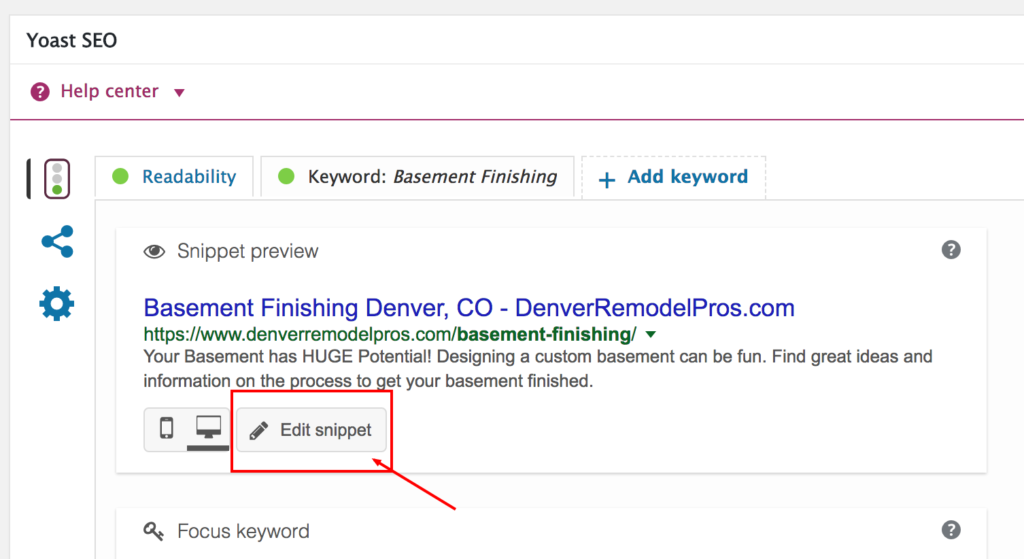
When the box opens you can edit the SEO title. The nice thing about Yoast is that the green bar will act as a guide to let you know if your title is too short or too long.
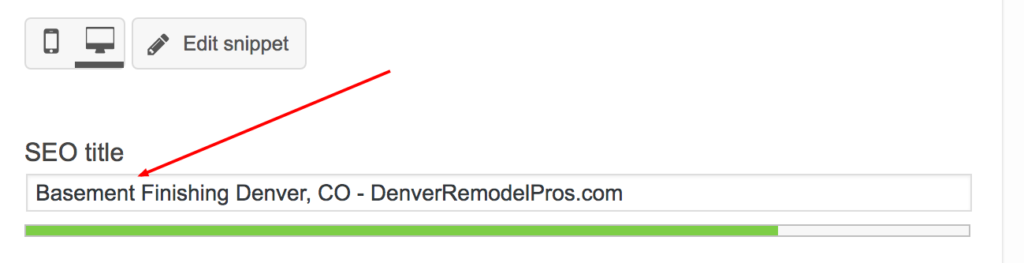
Setting your meta description
You will notice when you click the "Edit Snippet" button to edit your page title you will also have a field that will allow you to update your meta description. Just like the page title the goal is to write a brief snippet about why the targeted user should click on your page. Recommended guidelines for the meta description include:
- it should contain your target keywords once (no keyword stuffing)
- it should be an accurate description of the content the user will find on the page
- the length should not exceed 156 characters
- the length should longer than 70 characters
Task #9 - Do an SEO Audit using a Free Tool
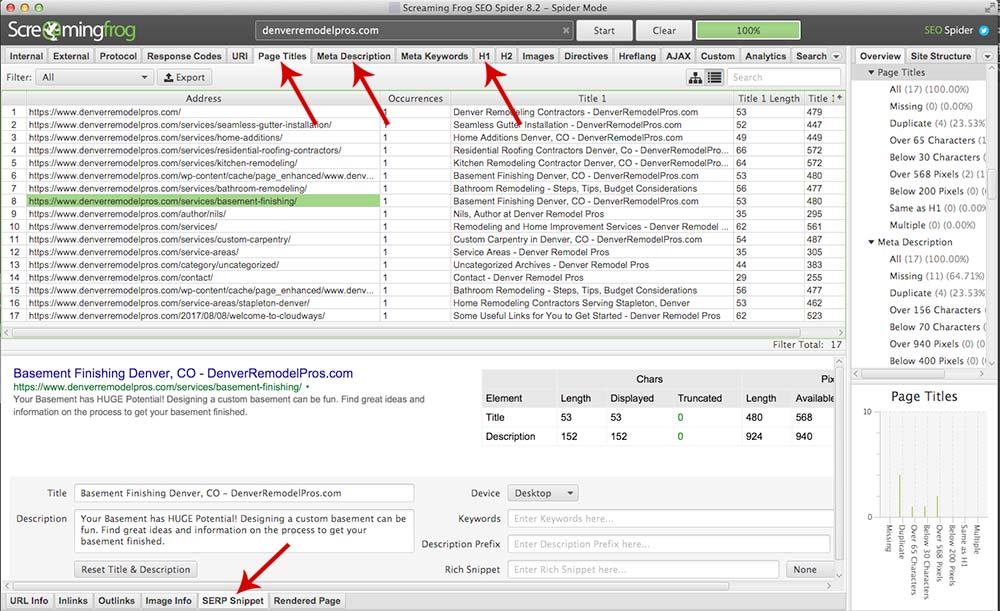
After adding/updating your content and optimizing your, h1, page title, and meta description then it is time to do an on-site seo audit. There are a couple of free tools you can use to do this like Screaming Frog or SEO Profiler. In this case we will walk you through how to do it using Screaming Frog.
2. Open it up on your computer and choose the free version. The free version is more that sufficient for most small business websites.
3. Enter in the URL of your website at the top of the window (see below)

4. Once the program has crawled your site then you will get a detailed report of all the pages on your website. Right now we are going to check your page titles, meta-descriptions, and h1 headings to make sure they are a good length, not missing, and there are no duplicates. When the program has run you should get a report similar to the one shown below. When you click on the "Page Titles" tab you will get a list of all your pages and the information you need to see whether they are missing, duplicate, and at an acceptable length.
Task #10 - Optimize Your Website's Images
Optimizing your images can have real SEO implications. We will give you three simple ways to optimize your images. This task may take much longer than 30 minutes depending on the size of your site, for a business website with 5 pages this should take no longer than 30 minutes. Here are the three things we will do:
- Optimize the size of the image.
- Use descriptive keywords in the file name of the image.
- Use descriptive and relevant text in the alt tag of the image.
Again, we will use Screaming Frog to do a quick analysis of our images. Using the same crawl you did in the previous task click the "images" tab at the top. This will list all of the images gathered during the crawl. On the right you can filter by images that are missing alt tags and images that are over 100kb (see diagram below).
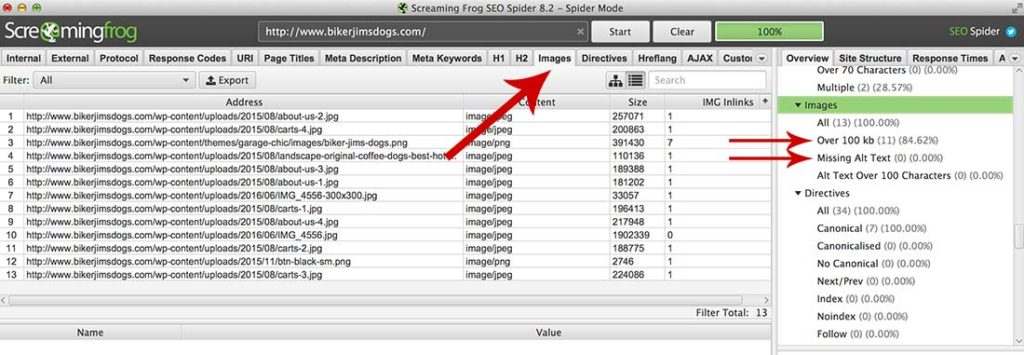
Lets start with the images over 100kb. The reason this is a big deal is because loading time has become extremely important as website traffic coming more from mobile devices. Large image files will slow down the loading time of your website on mobile devices. Studies show there is a correlation between faster sites and better rankings.
Optimize Images with Large File Sizes and Descriptive File Names
There is a great website that will optimize your images for you automatically, tinypng.com. However, first you need to use Screaming Frogs and identify which images are over 100kb. Once you have identified them then:
- Download them from your website
- Drag and drop them into tingpng.com
- Download the optimized files
- Rename the files with descriptive keywords (eg. description-of-image.png)
- Replace images on your website with these optimized images
Update img Alt Tags
In Screaming Frog you can find the missing alt tags on your site as well (see image above). Locate the missing alt tags and locate them on your website. If you are using WordPress you should be able to edit each image and locate the "alt" tag field. When you update the alt tag make sure to give a description that would be most beneficial to the user. The alt tags will appear if the image cannot load for some reason. It will also be read by screen readers for visually impaired users so there is an accessibility factor as well.
In Conclusion
So there you have 10 tasks that anyone can do to help their business website get optimized. Each task is designed to take no longer than 30 minutes (in most cases). Performing these simple tasks should give you a great foundation for becoming more visible online for your target demographic. It is also important to understand that the results may take time. The key is to always think about your user's experience and what they want. If you can satisfy that then your website will become a major asset for your business.